Narrative Scripting Part 1: The Holistic View
Previously, we dissected an example narrative script resulting in the outcome Customer receives loyalty points after an in-store purchase in the context of an imaginary coffee shop loyalty system. In this part of the guide, we’re going to trace the end-to-end process of creating the very same example.
We’ll be working strictly within the confines of what’s called the holistic view. This view provides a high-level definition of the script that serves product, design, and engineering stakeholders alike.
This is possible because the holistic view is entirely time-centric. Both the Interaction lane and the System lane track the Moments in the Context lane. By hiding away the details and minutia, and by focusing on the context locked in time, we reduce the cognitive load and are able to create a shared understanding for all the disciplines involved.
Let’s now dive into creating a holistic view narrative script.
List the desired outcomes
Before scripting any narrative, it is indispensable to first define the valuable outcomes that our product needs to realize. We define these outcomes via short statements, like these:
- Customer receives loyalty points after an in-store purchase.
- Customer earns bonus points for referring a friend to the loyalty program.
- Customer receives a birthday discount or free item on their birthday.
- Customer receives push notifications about promotions.
- Customer automatically receives a discount on their next purchase after leaving a positive review.
In essence, this is an outcome-driven, user-focused discovery exercise. Notice how each sentence clearly communicates the intended purpose without the need for any additional context.
Bear in mind that the list of desired outcomes is just a starting point. It doesn’t need to be exhaustive, as you can always come back to expand or modify it as needed.
Try now to have a look at some project you’re currently working on or worked on in the past. Go ahead and list your valuable outcomes.
If you’re eager to already move forward with creating your narrative script, it’s perfectly fine to just pick one outcome. Also, it doesn’t matter if this project has already been built or not. For new projects, listing the desired outcomes works like a discovery process, while in the case of an existing system, it provides us with an inventory (either for the sake of documentation or for rewriting legacy code).
If you’re unsure about your outcome definition, please go ahead and ask for feedback in the NDD community Slack.
Define Moments and Actors
In the very first phase of scripting, we’re going to be focusing on Moments and Actors alone.
First off, we set up a timeline with a few frames just to give us some space to work in. Since our outcome is Customer receives loyalty points after an in-store purchase, let’s try to imagine the very last moment before this outcome is realized. Beginning with the end in mind, we put this moment in the last frame:

Now, let’s think about all the moments that lead up to this point.
If we’re assuming the customer has a loyalty points balance, it begs the question of what that balance is to start with. Let’s define such a moment as the starting point of the script:

Ok, so what needs to happen in between these moments? We’re scripting this for an in-store purchase, so clearly the customer needs to enter the coffee shop first. They also need to buy something. Let’s assume they spend $10 which equals 100 loyalty points:

Now what? Well, it looks like there needs to be another character in this story, who’s going to take the payment. Let’s add this moment. This may also be a good time to name our Actors to better differentiate them.

This is already looking like a coherent narrative. However, it seems that something is missing here. We need to somehow connect Kim’s purchase with their loyalty account. We can do that using a barcode scanner before Alex takes the payment:

What else is missing? It appears something important needs to happen before Kim can actually see their increased loyalty points balance: the payment needs to be successfully processed.

So far so good. But what about redeeming loyalty points? Shouldn’t we give Kim a choice to redeem before increasing their balance? Looks like Alex needs to ask them about it. Let’s add a couple more moments to trace this exchange:

At this point, it seems that the progression of Moments provides us with just enough context to move on to the next step.
It’s your turn now to define the Moments and Actors for your narrative. You can use these questions as a reference:
- What is the valuable outcome to be realized?
- What is the very last Moment before this outcome comes to fruition?
- What is the first Moment that’s relevant for the outcome and sets the initial context?
- What are the Moments in between the first and last one?
- What are the Actors involved?
Once you’re done, let’s step out of the Context lane and start adding the other NDD constructs. Remember though that it’s perfectly okay to go back and forth between the different lanes as needed. You can always add extra frames with additional Moments at any time.
Identify Interfaces
Let’s have a look at all of the Moments from left to right to see which ones have interactions that would require some kind of an Interface.
The first such Moment seems to be Alex scans Kims loyalty code. Previously, we figured out there’s going to be a barcode reader involved here, so let’s add this Interface accordingly:

The purpose of scanning Kim’s loyalty code is to check their current loyalty points balance and, in the next Moment, Alex needs to see this information to ask Kim if they want to redeem the points. Let’s account for this by adding another Interface construct:

While this is optional, notice that we added a note to the transition between the two Interfaces saying “loads account”. This way we indicate the interaction between these Interfaces for extra clarity.
What’s the next Interface in this narrative? Well, Alex needs to somehow collect the payment from Kim, so let’s add another construct and note down the appropriate interaction:

Is there any other Interface missing? Clearly, for the very final Moment to occur, we need some kind of an Interface for Kim, too. Let’s add it:

Looks like we have a full set of Interfaces already. For added clarity, we might want to group them using colored tags to indicate the Interface type, like this:

From a user journey and UX perspective, this narrative seems pretty robust. However, it appears that there’s an abrupt jump between the payment and when Kim sees her updated loyalty points balance. We’re now going to switch over to the System lane to figure out the details for this part of the narrative.
Define Actions
Previously, we defined that the Action construct is a placeholder for business processes and system behaviors. Whenever we want the system to do something, we represent that as an Action, as simple as this:

Notice that this Action follows an interaction with the Interface Collect payment information, and continues the flow indicated by the arrows.
It appears that we still need something else to complete this flow though. The Process payment Action is only concerned with processing the payment, so it can’t handle updating the loyalty account balance. With this purpose in mind, let’s introduce another Action in a new frame:

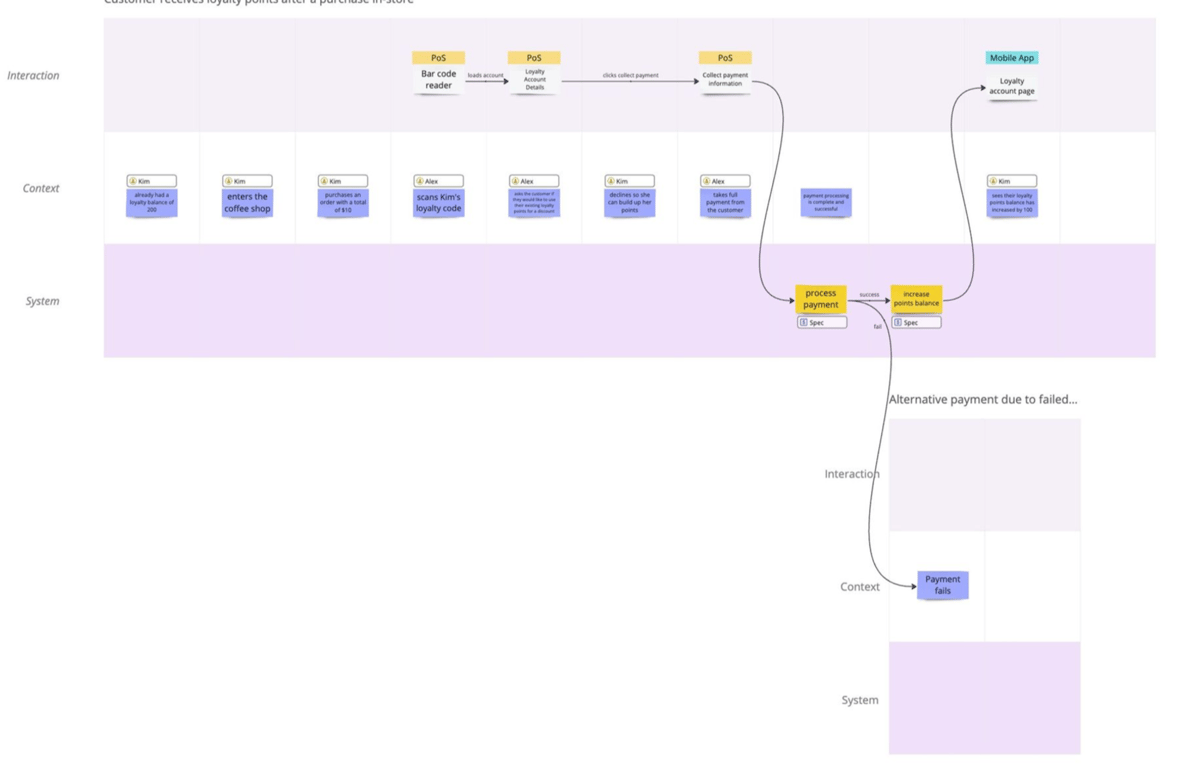
Now, we can see that the Process payment Action causes a reaction by triggering the Increase points balance action, which in turn produces a result that is displayed in the mobile app interface. The basic narrative script has been completed.
Again, it’s now your turn to identify Interfaces and define Actions in your script. Use the template and these questions as references:
- Which Moments seem to presume an Interface to be involved?
- Where do Actors interact with Interfaces? Do they trigger an Action as a result?
- Does any Action trigger another Action?
- Does any Action output a result into an Interface?
Add Specs
While the Action constructs act as placeholders for details to be figured out later, we can still add a little bit more detail about how we expect the Actions to work at this early stage.
We do this via specs. On the board, we can simply add extra text boxes to record these requirements:

At this point, these specs are loose and are meant as a conversation starter for more technical work down the road. In the case of the Increase points balance Action, the specs are a starting point for defining all the other rules around adding loyalty points that will eventually be needed.
Identify Branches
There’s just one more thing that we might want to add to this script. Notice that, in the specs for the Process payment Action, we defined that the payment may fail. But what actually happens when it fails, and where do we describe that?
This is where the concept of branches comes handy. A branch is like a fork used to describe a narrative’s variation.
We already noted down “success” on the transition that follows the Process payment Action. Since the payment can fail, we need a juncture into an alternative timeline:
We now have a branch that starts with the Payment fails Moment. But what happens next? Well, Alex will need to ask Kim for a different payment method, so let’s add such a Moment:

This now seems to circle back to the main branch, which is good enough for now. We could continue elaborating on this branch (e.g. by adding an Interface) but that’s beside the point. You can think of branches as placeholders that remind us of the possible alternative moments.
Sometimes, it may turn out that the branch justifies creating a new, full-blown script. However, you shouldn’t get distracted by such possibilities. Remember that you want to focus on the defined valuable outcome. For this reason, we just sketch out the starting point for the extra branch and come back to that conversation later.
End result and final words
In this chapter, we traced the process of creating a holistic view narrative script. The purpose of this type of script is to ideate a high-level overview of how a valuable outcome is realized.
The holistic view fosters a shared understanding among all the parties involved, regardless of their role. Although it’s best to script such narratives collaboratively to ensure that all different perspectives are accounted for, any team member can also start creating such a script on their own.
Let’s quickly recap how we created the script:
- We started with a clearly defined valuable outcome: Customer receives loyalty points after an in-store purchase.
- We then filled in the central Context lane with Moments and Actors.
- Based on the Context lane, we deduced the Interfaces needed in the Interaction lane.
- We then added Actions in the System lane to complete the flow.
- Finally, we added loose Specs for the Actions and identified an extra branch.
Bear in mind that, in real life, it’s entirely fine to go back and forth between the steps outlined above. You simply don’t know what you don’t know when you start. As you answer questions and uncover insights, you’re always free to expand and adjust the narrative as needed.
Being all over the place is sometimes part of the process. Imperfection is human, and that's perfectly okay.
If you’ve already completed your script, please join the NDD community and post it for review in the #narrative-scripting-bootcamp channel!
In the next chapter, we’re going to dive deeper and cover business process modeling constructs in the context of the coffee shop example.